BCON23: Custom Data in glTF files
Table of Contents
Introduction
A while back now in 2023, I attended the Blender Conference in Amsterdam where I
presented a bit of the work I had done related to Blender, glTF and Opacity
Micromaps. Despite the 50-min presentation though, I still had a lot of content
over that I had to cut out in the interest of time (and presentation
coherency). I had hoped to include much of that in this write-up shortly after
the conference, but I ended up swamped with work from both Arm and several
looming paper deadlines, so I had to postpone it. But here it is now, so better
late than never I guess!
The presentation, as well as the slides and other material on the subject can be found on my publications page. Note that this page is meant to complement the presentation and not necessarily replace it, so there may be a fair bit of repeated content here. If you only want the new stuff though, you can find it under the extras section below.
Also, please note that this page is still a bit of work in progress: I will
eventually cover the same material as the presentation as well as extend it over
time should anything change in regard to the Blender glTF support.
What is glTF?
For completeness, we should of course start of with talking a bit about what
glTF actually is. In short, it is a royalty free format for transmitting and
loading 3D scenes and models, while still keeping the data itself as small as
possible, both in-memory and when it is stored on disk. Additionally, and most
interesting in this case: It is very extensible.
However, glTF is not a universal 3D modeling format. The base primitives it
supports are distinctly geared towards real-time rendering use-cases. In fact,
many of the constants used in the format map directly to the equivalent API
values in OpenGL, all to make it as seamless as possible to load all data and
directly send it to the GPU. It is of course not limited to that, however. And
since the format is extensible, it is easy to repurpose it for different tasks.
Types of glTF Files
Generally speaking, there are three types of glTF files:
-
GLTF_EMBEDDED - All scene, model and texture data is encoded in a single
JSONfile. Binary data is stored asbase64encoded strings. GLTF_SEPARABLE- The structure of the scenes and data is stored in the
JSONfile. Any associated binary data is stored in separate files:-
.png,.jpeg,.webpfor images, and, -
.binfor general binary data, such as vertex positions, etc.
-
-
GLTF_BINARY - All data baked into a single binary format, which is most
easily thought of as a binary equivalent to
JSON.
These days though, it seems like in Blender 4.0 the support for creating new
GLTF_EMBEDDED, has been removed.
A Peek Inside
As we take a peek inside the glTF file, we can use the following diagram to
get an almost complete overview of the format, or at least, all entities that
exist in the glTF world and how they are related to each other:

There are a few high-level things to note here: The topmost part of the file describe the scene graph(s) and models, whereas the lower parts more closely define the data-storage models.
As most of this work is more closely related to the data-model, I will skip the details about the scene-graph and shading aspects. If you are interested in those aspects, I would suggest checking out Julien Duroure excellent BCON23 presentation instead.
Data Storage Model: Buffers, Views and Accessors

Handling custom data inside the format typically boils down into packing your
existing data into something that glTF can understand. And, beyond using
JSON primitives, the following basic building blocks can be used:
Buffers- The Buffer is the lowest level of data storage: An unstructured array of bytes.
BufferViews- A container of metadata on how to index a
Bufferwith anoffset,strideandlength. Accessors- Descriptor over the amount, and type of data, (
uint32,float,vec3, etc.) that aBufferViewpoints to. Textures- Descriptor with pointers on how to find
ImagesandSamplers. Images- A descriptor of a
JPEG,PNGorWEBPimage metadata, with pointers to find the image either directly in theglTFfile as aBufferView, or with aURIlink to it. Sampler- Describes how an image is intended to be sampled, i.e., how texels are wrapped and filtered.
On the Blender side of things, these objects are eventually translated to a set
of Python classes by the glTF importer and exporter addon. Each object that
exist in glTF has a corresponding class associated with it, and any entity
that was cross-referenced in JSON with integer indices gets resolved into a
proper object-reference, all to make it a lot easier to handle the data. Thus,
the following entity-to-class translation occurs:
-
Buffer,BufferView⇒BinaryData -
Accessor⇒Accessor -
Texture⇒Texture -
Image⇒ImageData -
Sampelr⇒Sampler
If you are working with glTF in any capacity, I strongly suggest you keep the
specification around as you will probably be looking up exactly what any of the
objects contain or point to a number of times. This is useful to understand both
the file format and classes on the Blender side as the above classes act as both
a data-container and a wrapper for reading and writing to the various types of
glTF files.
The glTF Extension Mechanism
Most import for us though, is the Extension mechanism. As noted above, the
glTF-file is really just a kind of JSON file. As such, we can technically
add whatever data we want to it. Obviously, some aspects are mandatory in order
to be compliant with glTF, but the specification also gives us an official way
for adding new attributes in a structured fashion.
import io_scene_gltf2.io.exp.gltf2_io_binary_data as exp
import io_scene_gltf2.io.imp.gltf2_io_binary_data as imp
indices = [0, 1, 2]
binary_data = exp.BinaryData(bytes(indices))
decoded = imp.BinaryData.decode_accessor_internal(binary_data)
This is done by adding new key-object pairs under a special
extension-object. The key in this case is the vendor prefix: Typically the letters KHR, for Khronos in this case, or similar for other commercial
entities, followed by a descriptive title. In this case, lights_punctual which
allows us to embed various point-like light-source in the scene. For this talk
though, everything is obviously assumed to be custom, so where applicable I will
just use the prefix NONE.
These extensions essentially come in two flavors: required and optional. As the
names suggest, if an extension is required, a compliant glTF-parser or
renderer should abort if it does not support the extension. E.g., meshes that
are compressed with an unsupported algorithm, could fall under this category.
Optional ones though could be things such as metadata containers, or optional rendering features. I.e., if the client does not support it, it should still be able to use all other data, although renderings may be different from what the author intended.
{
  "extensionsUsed":[
    "KHR_lights_punctual",
    "KHR_materials_transmission"
  ],
  "extensionsRequired":[
    "KHR_lights_punctual"
  ],
  "extensions":{
    "KHR_lights_punctual":{
      "lights":[]
    }
  }
}
Extensions that are used by the glTF file are listed in the top of the JSON
structure, as in the above example.
"nodes": [
    {
        "extensions":{
            "KHR_lights_punctual":{
                "light":0
            }
        },
        "name":"Point",
        "rotation":[],
        "translation":[]
    },
]
Depending on the extension itself, more extension-keys can be found elsewhere
in the file. E.g., the above extension can define point-lights attached to the
scene-graph. Where and how these keys are found is entirely up to the extension
itself however. Sometimes though, extensions end up being useful for many people
out there, as such they may become standardized, and a collection of these can
be found here:
Creating official extensions in this way is well beyond the scope of this write-up however, but this link should be enough for the interested parties out there.
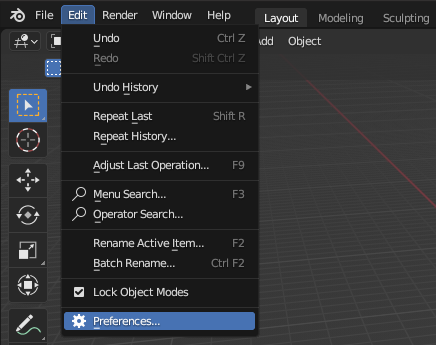
Intermission: Installing and Enabling Plugins
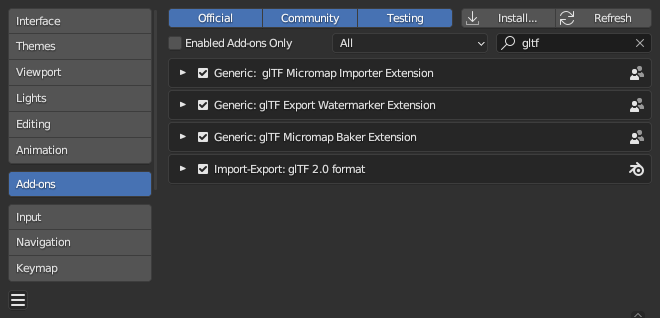
Blender already have a pretty good page about installing and enabling addons. However, I have included the following images of the Blender 4.0 UI that shows how to find, install, and enable addons, just in-case:
Once a glTF plugin has been installed and enabled, the glTF export menu
should be populated with a few more entries to reflect this, as seen below:

This can of course change depending on the plugin itself, but it is a good place to allow the user to enable or disable the use of the plugin.
Blender-4.2 Update
Note that in Blender 4.2 the addon management has changed pretty significantly, as is detailed here. For now, they can still be installed on a per-file basis as described in this post, but it is likely that this will be deprecated and removed at some point in the future.
Blender has also provided a page about creating extensions here. I may eventually update this page based on this, or even create my own extension repository with some of this work, but this will have to wait for now.
A First Example: Watermarking

Now though, it is about time to show the first actual glTF plugin: A simple
tool that watermarks all textures during export. This is admittedly a bit of a
facetious use-case, but it is a good, simple example to show off how to create
these types of plugins.
The Goal
Let us start with a clear goal in mind for this plugin: We want to be able to
choose an image to use as a watermark on all images exported by the glTF
addon. To that end, we want to add a panel to the glTF exporter that looks
something like this:
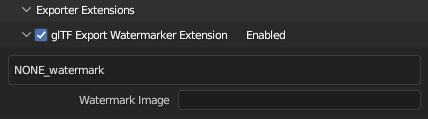
Basically, we want the ability to enable or disable the watermark-plugin and be able to select what image to use as a watermark. I am sure there are a lot of other potential options that could be added here, such as watermark location, size, etc. but for now, let us keep things simple.
Addon/Plugin Information
Starting from the top: The first thing we need is a special variable called
bl_info that Blender uses to pick up metadata about the plugin, such as the
name, description, current version, which Blender versions it supports, and so
on. You can see an example of this below:
bl_info = {
    "name": "glTF Export Watermarker Extension",
    "category": "Import-Export",
    "version": (1, 0, 0),
    "blender": (3, 0, 0),
    "location": "File > Export > glTF 2.0",
    "description": "Watermark any exported image texture.",
    "author": "Gustaf Waldemarson",
}
This is not unique to our plugin though, but is something used by all Blender addons. And after a bit of digging, I even found a link to the specification for this variable, so here you can see all options that you can (and should) add to it.
Properties
Next, we need to create a so-called property class that we can use to contains the control options, in short, we want something like this:
class WatermarkingExtensionProperties(bpy.types.PropertyGroup):

    enabled: bpy.props.BoolProperty(
        name="glTF Export Watermarker Extension",
    )
    watermark: bpy.props.StringProperty(
        name="Watermark image",
    )
Essentially, we want a boolean property to determine if we should enable or disable the plugin, and a string to identify the image we want to use as a watermark.
Furthermore, these properties will help us to create appropriate buttons to change these options, but to create those, we need to create a panel:
class GLTF_PT_UserExtensionWatermarkingPanel(bpy.types.Panel):
    bl_space_type = 'FILE_BROWSER'
    bl_region_type = 'TOOL_PROPS'
    bl_label = 'Enabled'
    bl_parent_id = 'GLTF_PT_export_user_extensions'
    bl_options = {'DEFAULT_CLOSED'}

    def draw_header(self, context):
        props = bpy.context.scene.WatermarkingExtensionProperties
        self.layout.prop(props, 'enabled')

    def draw(self, context):
        layout = self.layout
        layout.use_property_split = True
        layout.use_property_decorate = False
        props = bpy.context.scene.WatermarkingExtensionProperties
        layout.active = props.enabled
        box = layout.box()
        box.label(text="NONE_watermark")
        layout.prop(props, "watermark", text="Watermark Image")
This class effectively determines the look-and-feel of the controls for the
options. It also contains a slew of variables and methods to define how to
create the buttons that set the properties, where they should be created, and so
forth. Of particular interest in this case is the bl_parent_id variable. When
it is set to the special string, GLTF_PT_export_user_extension, it signals
that we are a child of the main glTF export panel. Obviously, we could change
this and place these options elsewhere, but this is a logical place for it:
Right next to the other glTF export options.
Blender Registration and Un-Registration
Next, we need to actually register these classes with Blender and store them somewhere in the scene context such that we can actually modify or retrieve them at a later time.
Here though, we may actually run into a minor problem: Our plugin implicitly
depends on the main glTF addon, hence, if that addon is not actually loaded
yet, and we will fail to register the panel. Thus, while crude, the simplest way
to handle this is simply to use try-except guards:
def register():
    bpy.utils.register_class(WatermarkingExtensionProperties)
    prop = bpy.props.PointerProperty(type=WatermarkingExtensionProperties)
    bpy.types.Scene.WatermarkingExtensionProperties = prop

def register_panel():
    try:
        bpy.utils.register_class(GLTF_PT_UserExtensionWatermarkingPanel)
    except Exception:
        pass
    return unregister_panel
Further, if we can register the classes, we should also have the ability un-register them, should we want uninstall the plugin. This is done with a corresponding functions:
def unregister_panel():
    try:
        bpy.utils.unregister_class(GLTF_PT_UserExtensionWatermarkingPanel)
    except Exception:
        pass

def unregister():
    unregister_panel()
    bpy.utils.unregister_class(WatermarkingExtensionProperties)
    del bpy.types.Scene.WatermarkingExtensionProperties
The glTF Exporter Class
Now we finally get to the class that defines these glTF plugins. In your
script, you should define a class with the exact name glTF2ExportUserExtension
and add methods to it that corresponds to what we want to customize. In our
case, we want to customize all images, something that is done by using the
appropriately named gather_image_hook, where we simply receive the glTF
image, and the Blender equivalent. With those, we are free to modify each of
these as we see fit, such as in our case: Adding a watermark based on our input properties.
To avoid the dependency problem I mentioned earlier, it is best to avoid
import calls to dependent modules until we know that they are present, hence
these import statements that are found in somewhat funky locations.
class glTF2ExportUserExtension:
  def __init__(self):
    from io_scene_gltf2.io.com.gltf2_io_extensions import Extension
    self.props = bpy.context.scene.WatermarkingExtensionProperties

  def gather_image_hook(self,
                        gltf2_image,
                        blender_shader_sockets,
                        export_settings):
    watermark(gltf2_image)
This is essentially the minimum that a glTF plugin needs to contain. However,
as we will get into in a bit, there are a few additions that I recommend that
you add to make the code more robust, especially if you are targeting multiple
Blender versions.
I should also mentioned that in addition to the above class, you can also create
a list or tuple variable called glTF2ExportUserExtensions (notice the s).
That list should then contain all classes that have customization methods that
you want to use for you plugin.
Applying the Watermark
The function that then performs the actual watermarking looks something like this:
def watermark(self, gltf_image):
    img = img2numpy(gltf_image)
    img = watermark_internal(img, mark)
    data = img2memory(gltf_image.mime_type, img)
    mime = gltf_image.mime_type
    if gltf_image.uri:
        import io_scene_gltf2.io.exp.gltf2_io_image_data as gltf
        name = gltf_image.uri.name
        gltf_image.uri = gltf.ImageData(data, mime, name)
    else:
        import io_scene_gltf2.io.exp.gltf2_io_binary_data as gltf
        gltf_image.buffer_view = gltf.BinaryData(data)
In short, it does this:
- First, convert the encoded
glTFimage to something we can use, such as anumpyarray in this case. - Then, we read the cached watermark image and apply it.
- And finally, we convert the image back to a binary format again.
We do have to be slightly careful though: It is the user that decides what
format the image is stored in depending on the GLTF_EMBEDDED or
GLTF_SEPARABLE option. Hence, a good plugin should respect that choice, even
if we could override it here. Thankfully, this is pretty easy to handle: We
simply check the uri attribute of the original image, and then use either the
BinaryData for embedded formats, or the ImageData class for the separable ones.
The glTF Extension Class
Lastly, I want to say a few words about the so-called Extension class provided
by the glTF addon, which I did not actually have to use in this example. This
is a special class used to signal that we are adding extension data of some kind
so that the exporter can add it to the list of used Extensions. As I showed
before though, we can place this class pretty much anywhere, such as in the node
hierarchy in this example:
def gather_node_hook(self, gltf_obj, bl_object, export_settings):
    key = extension_name
    if self.properties.enabled:
        if gltf_obj.extensions is None:
            gltf_obj.extensions = {}
        gltf_obj.extensions[key] = self.Extension(
            name=key,
            extension={"float": self.properties.float_property},
            required=False,
        )
It can also contain anything that is representable as JSON data, and this
includes any of the other glTF classes, even the special BinaryData and
ImageData classes I showed earlier, and in those cases, the data is packed
into buffers or exported as files and the references are replaced with buffer
views or URIs.
Distribution
As I said before, I think that this is a good example to show-case what can be done with these kinds of plugins. As such, I am striving to make this available in its entirety in the not to distant future, but I still need a go-ahead from Arm before that can happen.
Customization Methods / Hooks

In the previous example we only used a single hook to modify all images, but the glTF plugin exposes many more export hooks:
gather_animation_hook(...)
gather_animation_channel_hook(...)
gather_animation_channel_target_hook(...)
gather_animation_sampler_hook(...)
gather_asset_hook(...)
gather_camera_hook(...)
gather_gltf_extensions_hook(...)
gather_image_hook(...)
gather_joint_hook(...)
gather_material_hook(...)
gather_material_pbr_metallic_roughness_hook(...)
gather_material_unlit_hook(...)
gather_mesh_hook(...)
gather_node_hook(...)
gather_node_name_hook(...)
gather_sampler_hook(...)
# ...
Effectively, each of these correspond to some entity in the glTF format, on
this page however, we will only really be looking at a much smaller selection:
gather_image_hook(...)
gather_mesh_hook(...)
gather_primitive_hook(...)
This is obviously quite limiting, but I think that just the mesh-hook alone is
a good example such that it is pretty easy to infer what can be done with any of
the other hooks and each of these are typically a variation of the following:
gather_mesh_hook(self,
                 gltf2_mesh,
                 blender_mesh,
                 blender_object,
                 vertex_groups,
                 modifiers,
                 materials,
                 export_settings)
Generally speaking, each of these hooks is a Python method that receives both
the Blender and glTF versions of the object that we are exporting or
importing. In the case of a mesh, we get both the Blender and glTF meshes,
including references to the object it belongs to, the vertex groups, modifiers
and materials, and so on.
Further, all methods also get a dictionary that contains various global export
options, such as the output directory where any generated file should be placed,
if we are exporting in JSON or binary mode, etc.
Then, in order to add any new data to the glTF objects, we simply modify them
here. The main glTF addon will then handle to translations to the various
different file formats. Furthermore, to add data during the import process we
simply modify the Blender objects instead as you can see a bit later in the importer section.
Micromaps - VK_EXT_opacity_micromap

This brings us to my actual use case for this kind of plugins: I primarily use
glTF as an input format for my research renderer, which is often used to
investigate new techniques or types of data. However, creating or parsing new
formats for each new type of data can get tedious pretty quickly. Eventually
though, I realized that this glTF extension mechanism could be used to
simplify this matter.
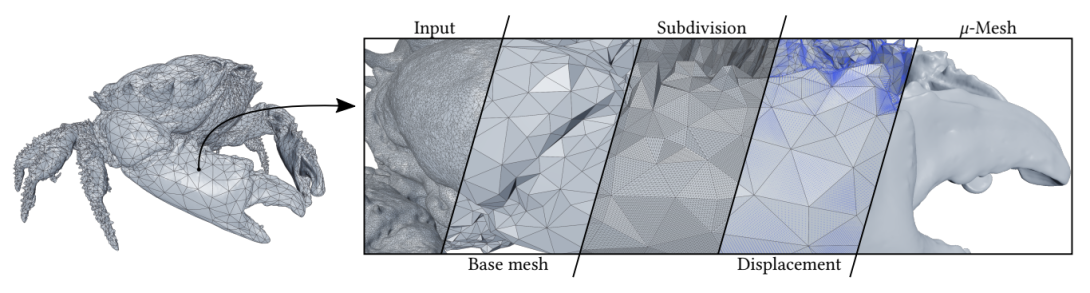
So, at the time of this presentation, I was working on a relatively new type of rendering object in Vulkan® and DirectX® known as a Micromap, or more specifically, an Opacity Micromap. Without digging into the details, we can describe this object as follows:
- Take any triangle,
- Split each edge at their midpoint, forming 4 new, virtual sub-triangles,
- Repeat this process \(n\) times.
- Next, associate a value with each of the sub-triangles,
- and finally, linearize these values with a space-filling curve, giving us an array of values: I.e., our micromap.
In short: You can view the micromap as very specialized per-triangle texture, and the goal of this plugin is to generate representative micromap data given the existing alpha textures. There are of course a lot more details to this and if you are interested, you can read more about it on my publications page.

As an example, once micromaps have been applied to a scene, such as our traditional Sponza scene above, we can get an effect that looks something like this. Note that this is entirely without using any kind of alpha-mapping: The micromaps alone are making the geometry more granular.
And while this looks like we are storing an array of values, the kicker is though that each of these elements only need two bits each, with each value described below. In fact, there is another mode where we only use a single bit per value. Hence, these micromaps can be extremely compact compared to a typical alpha-map.
- Transparent
0 - The sub-triangle is 100% transparent.
- Opaque
1 - The sub-triangle is 100% opaque.
- Unknown
2, 3 - Unknown opacity with escape hatches for faster processing in some cases.

And for completeness: At rendering-time, there is a very efficient algorithm for going from barycentric coordinates to a micromap-index, and consequently the micromap-value stored in that specific sub-triangle.

The Exporter

So, in my case I wanted to create a plugin that can generate these micromaps and
embed them as a part of the glTF-file, but we also want them to be
realistic, that is, we want our exporter to find any alpha-texture associated
with each triangle and generate a representative opacity micromap for it. In
brief, we want to do the following:
for triangle in scene:
    if tri.alpha_map:
        generate_micromaps(tri.alpha_map)
And just so we are all clear on exactly what we want in the end: We want to be
able to generate glTF-files that contains extension objects that look
something like this:
"meshes":[
{
  "name":"Plane.001",
  "primitives":[
    {
      "extensions":{
        "NONE_opacity_micromap":{
          "level":2,
          "mode":"4state",
          "micromaps":[
            "0b00101010000000001010101010101000",
            "0b00000000100010101010100000100000"
          ]
        }
That is, each primitive (i.e., list of triangles) should now have a list of micromaps associated with it, with any interesting metadata, such as the subdivision level included in it.
On the face of it, we should be able to add a customization method for
primitives and process each of them during the export process. Unfortunately,
glTF structures primitives as you can see below, and of particular note is
that materials, and consequently, the alpha-textures, are attached to the mesh
rather than the primitive. So we actually need to move up a bit and customize the mesh-exporter instead.

Additionally, the micromaps needs to be matched with the correct vertex indices.
Which may be a bit troublesome, as the Blender indices does not necessarily
match the one used by glTF, at least not at the time of writing this.
Further, another good reason for moving up to the mesh level is that we can more easily attach some control attributes on each object that we can use to control the micromap generation process on a per-mesh-basis, which you can also learn more about in the extras section at the end.
Thus, to adapt our loop to the glTF world, we will do the following: Each time
we export a mesh, check if the triangle contains alpha-textures, and if so:
- Extract the
glTFtriangles (indices, UVs, materials and textures). - Use these to map all triangles to the alpha texture(s).
- Generate the opacity micromaps from that mapping.
- Store them in the
.gltf-file.
In pseudo-code, this roughly become:
for mesh in gltf_scene:
    for primitive in mesh:
        alpha_map = mesh.material.baseColorTexture
        if alpha_map:
            indices = gltf_access(primitive.indices)
            tex_coords = gltf_access(primitive.tex_coords)
            primitive.extension = micromaps_extension(...)
This is easily implemented in the glTF-hook gather_mesh_hook(), as you can
see below. Although, there are a number of caveats that make this a bit more
challenging in practice: Each time a micromap is divided, it quadruples the
number of sub-triangles that needs to be processed. In total then, there are
\(4^n\cdot\#\text{primitives}\) subtriangles to handle, but thankfully, each of
them are also computationally independent.
def gather_mesh_hook(gltf_mesh, bl_mesh, ...):
    for primitive in gltf_mesh:
        alpha_map = gltf_mesh.material.baseColorTexture
        if alpha_map:
            indices = gltf_access(primitive.indices)
            tex_coords = gltf_access(primitive.tex_coords)
            primitive.extension = micromaps_extension(...)
Clearly, we want to parallelize this as much as possible, which in the case of
Python, means bringing in the multiprocessing module, and probably also some
way of profiling the code to find any problematic parts but those details are
left for the extra section.
Storage Formats
Exactly how data is stored or reference in the glTF is entirely up to the
author. As an example, I tried both storing the data as strings directly in the
JSON portion of the glTF file and embedding it in a buffer. Code-wise
however, the difference is minimal:
mm_strs = [str(mm) for mm in micromaps]
ext = {
    "level": micromaps.level,
    "mode": micromaps.mode,
    "format": "linear",
    "micromaps": mm_strs,
}
return Extension(extension=ext, ...)
mm_bytes = pack_micromaps(micromaps)
ext = {
    "level": level,
    "mode": mode,
    "format": "buffer",
    "micromaps": BinaryData(mm_bytes),
}
return Extension(extension=ext, ...)
There are of course trade-offs between these versions:
- Strings are arguably simpler to use and is relatively simple to edit after the export for small micromaps, for instance, when writing unit-tests.
- Large micromaps are probably not modified in such a way, so for them, we may
as well store them using the existing
glTFbuffer-system.
It is also possible to create entirely new file formats to contain this data. As
an example, an Nvidia extension created a so called bary-file to contain this
type of micromap data instead. I personally do not see the point of introducing
a new format for this however: The existing glTF primitives are more than
sufficient to contain this data.
You have to be a bit careful however: While glTF is working, the entire JSON
portion of the file is kept in memory, so if you store too much in there, it is
possible to run out of memory during the export process.
As an example, I once attempted to export a gigantic scene with large micromaps in the string format. And while everything seemed to work in the beginning, it always ended up crashing for seemingly random reasons which left me scratching my head for a while until I realized what was happening.
The Importer

Lastly, I want to briefly mention something about importers. Mostly, I have been
focused on exporters, which makes sense: It is what I have primarily worked
with. However, it is also the most common use for glTF; typically you have a
detailed model with a lot of data (in Blender or some other framework) that is
effectively filtered as you export it.
There are of course exceptions, and the most compelling use case is probably compression. Say that we have developed a new compression algorithm, then we might want to use an importer plugin to test the decoding process.
Structure-wise, importers are very similar to exporters: The main thing that can
differ is that we sometimes have both a before and an after hook, which
makes sense: We cannot work on compressed data without actually decoding it first.
Developing a complete decoding/encoding pair is obviously far outside the scope of this work, so we will settle for a much simpler example:
class glTF2ImportUserExtension:

    def __init__(self):
        from io_scene_gltf2.io.com.gltf2_io_extensions import Extension
        self.properties = bpy.context.scene.OmmImporterExtensionProperties
        self.extensions = [Extension(name="NONE_opacity_micromap",
                                     extension={},
                                     required=False)]

    def gather_import_mesh_after_hook(self, gltf2_mesh, blender_mesh, gltf):
        if self.properties.enabled:
            create_micromap_attributes(gltf2_mesh, blender_mesh)
This simple importer looks for the presence of micromaps in the input
glTF-mesh, and if found, adds appropriate attributes such that they will be
re-generated during the next export:
mode, level, quality = find_attributes(gltf_mesh)
if level:
    bl_mesh["micromapLevel"] = level
if mode:
    bl_mesh["micromapMode"] = mode
if quality:
    bl_mesh["micromapQuality"] = quality
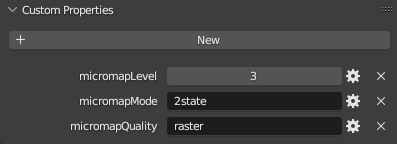
And of course, setting attributes such as these is easy: We simply need to find
some attributes such as the mode, level and quality in this example, by
scanning the glTF mesh for these extension keys. Then we set these attributes
on the Blender mesh object. Once imported, you can find them under the custom properties:
This is arguably of limited use, but a tool like that could be useful if you are importing old models or are compositing several models together, to name just two use cases.
Other Types of Micromaps
Most of my work focused on Opacity Micromaps. However, Nvidia have defined at
least one other type known as a Displacement Micromap which is already available
in Vulkan® and DirectX® as a provisional vendor extension. On top of that, it
seems like they are also working more types of micromaps, as they have defined
glTF extensions for micromaps with more general attributes on each sub-triangle.
This is not something that I have had time to explore in detail, but modifying my plugin to output data in the same format seems like a good idea for the future.
Additionally, displacement micromaps might be something to keep an eye on in the future. As this could be something that may be nice to somehow fit into the sculpting baking process. But, this is just me speculating; I don’t know enough about this extension or the baking process just yet to have a valid opinion in this regard.
Presentation Summary
And just to quickly summarize everything: In my talk, and now in this post, I
have talked quite a bit about what glTF is and how it is structured, the addon
that Blender uses to import and export from glTF files, as well as how to
create plugins for this addon that allows us to customize the export and
import process.
With this, I included a few illustrative examples, such as a simple watermarking tool, and showed how the same basic tools can be combined to build something much more custom, such as the micromap exporter and importer.
Finally, I also provided a small collection of tips and tricks for handling Multiprocessing or profiling as well as how some examples on how to make effective use of Blender on the command-line, however, my talk could not really include all that content, so all those extra tidbits are now available here instead.
Extras
For me personally, everything work-related should be done on a Linux (or Mac) machine, and this includes all extracurricular programming. As such, the following sections contain some tips and tricks for a better work-flow in regards to these kinds of plugins, but this is obviously of limited use to Windows users, so read it at your own discretion!
Running From the Command-line
![]()
One of the more useful things (at least for me) that I really did not have time to dig into during my presentation was how to run these and other Blender plugins from the command-line. This may seem a bit esoteric, but trust me: Once you have opened the export-menu a few times in a row to test something, you really start wishing for a simpler way.
Besides, the glTF export process can actually take a really long time in
some cases, so this trick can also be used to start up multiple new Blender
instances to handle the exports.
To do this, you essentially have two options:
- Using a Bash scripts that runs Blender with
--backgroundand--python-consoleor--python-text, or - A Python script with
--backgroundand--python.
For the first one, you could write a script such as:
#!/usr/bin/env sh
# Use Blender to load 3D scene and test to re-export it as glTF.

input=${1:?"No input .obj file given"}
output=${2:?"No output directory given"}
base_ext=$(basename ${input})
base=${base_ext%.*}
mkdir -p ${output}
blender --background --python-console <<EOF

import bpy

for c in bpy.context.scene.collection.children:
    bpy.context.scene.collection.children.unlink(c)

bpy.ops.wm.obj_import(filepath='${input}')

bpy.ops.export_scene.gltf(filepath='${output}/${base}.gltf',
                          export_cameras=True,
                          export_lights=True,
                          export_format='GLTF_SEPARATE')
EOF
For the second one, you could write the same script as:
blender --background --python script.py -- scene.obj scene-dir
Where script.py contains the following:
import sys
import bpy
import os
import os.path
argv = sys.argv[sys.argv.index("--") + 1:]
if len(argv) == 0:
    print("No input .obj file given")
    exit(1)
if len(argv) == 1:
    print("No output directory given")
    exit(2)

for c in bpy.context.scene.collection.children:
    bpy.context.scene.collection.children.unlink(c)

infile = argv[0]
output = argv[1]
base, _ = os.path.splitext(os.path.basename(infile))
os.makedirs(output, exist_ok=True)

bpy.ops.wm.obj_import(filepath=infile)

bpy.ops.export_scene.gltf(filepath=os.path.join(output, base),
                          export_cameras=True,
                          export_lights=True,
                          export_format='GLTF_SEPARATE')
Which of these to use really depends on your preferences. Personally, I tend to prefer Bash when possible since it is often possible to write them really succinctly. But for longer things with more complex logic I usually end up with a Python script instead.
Python Dependencies
Unfortunately, it is not always straight-forward to install modules the
traditional way with pip, since Blender uses its own instance of Python that
is not necessarily connected to the one used by the system. In my case, the
scripts I developed to handle the micromap-generation only used a few extra
dependencies, most notably matplotlib, which I needed to get access to
somehow. What I ended up with, is the following bash script:
#!/usr/bin/env bash
# Install blender Addon and required utilities (Blender 3.4-4.0).

script_dir=$( cd -- "$( dirname -- "${BASH_SOURCE[0]}" )" &> /dev/null && pwd )
blender=${1:-blender}

# Find the Blender python binary and addons directory paths.
empty=$(${blender} --background --python-expr "print()")
python=$(${blender} --background --python-expr "import sys; print(sys.executable)")
addons=$(${blender} --background --python-expr "import bpy; print(bpy.utils.user_resource('SCRIPTS', path='addons'))")

# Strip additional junk from the Blender output.
python="${python::-${#empty}}"
addons="${addons::-${#empty}}"

${python} -m pip install --target="${addons}/modules" --upgrade matplotlib

printf "Addon installed in: ${addons}\n"
exit 0
In short, it figures out the Blender versions and paths to the internal Python interpreter and uses those to install the necessary dependencies.
This worked for me. However, Python dependencies are currently a rather serious problem for all Blender plugin developers:
If two different plugins uses the same dependency, but different versions of it, one of them is going to have a terrible time. During the conference I saw some suggestions of bundling all dependencies with the plugin and manipulating the module search paths to ensure that only the “right” modules were being used.
This felt extremely hacky, but I also do not really know a better way to solve this. I do hope though that the primary Blender developers will develop some official way to list dependencies with the addon to avoid these issues.
Perhaps we should add a bl_requirements variable that should contain the
content of pip freeze? I.e., the third-party dependencies?
  bl_requirements="""
lxml==4.9.3
matplotlib==3.7.1
numpy==1.24.2
  """
Then it would be up to Blender to install those during register / unregister
or during addon installation. I am not a Blender developer though, So I do not
know how feasible this would be in practice.
Profiling
![]()
Another area that I only briefly mentioned in my original presentation is the
matter of profiling the plugins, so let us dig a bit deeper here: In general
Python code, the easiest way to profile a script is simply to run it through the
cProfile or profile module, e.g.:
python -m cProfile test.py <remaining arguments...>
# or
python -m profile test.py <remaining arguments...>
The glTF exporter plugins runs inside Blender however, something that makes
the situation a bit trickier. Naturally, we could profile all of Blender, but
that would add a lot of noise that we would have to filter out. Thankfully, both
of these standard Python modules provide some additional tooling to improve upon
things. And we only really need two things:
- A method to start counting our function calls,
- A method to stop counting our function calls.
These can then be inserted in our code, roughly like this:
def gltf_export_mesh():
    profiler.enable()
    # ...
    profiler.disable()

def glTF2_post_export_callback(export_settings):
    for obj in export_settings['gltf_user_extensions']:
        if isinstance(obj, glTF2ExportUserExtension):
            obj.print_profiling_stats()
And if we do not want to profile all the time, we could just add appropriate attributes to enable those calls conditionally. In my case, I ended up with a dummy-profiling class like this:
class DummyProfiler:
    def enable(self):
        """Simulate enabling the profiler."""
    def disable(self):
        """Simulate disabling the profiler."""
    def __bool__(self):
        """We are not profiling."""
        return False
Another option would be to create a context-manager to handle this, but that is mostly a matter of preference.
Debugging
Another thing to mention is the matter of debugging the plugins. A bit
embarrassingly, I often prefer use print-statements to figure out what is
going on. Obviously though, sometimes there is too much state to print out at
once, and you really need to get a prompt in there. To that end, the best thing
to do is what the Blender documentation recommends: Add this (slightly cryptic)
one-liner at the place where you want your prompt to start:
__import__('code').interact(local=dict(globals(), **locals()))
Note though that this is only a normal Python prompt. Typically, it’s better to have a proper debug prompt, which you can get with this line instead:
import pdb; pdb.set_trace()
That same Blender page also has plenty of more tips and tricks that may be useful for you, so do check it out!
Extras and Custom Vertex Attributes
Beyond the mechanism mention here, there are at least two more ways to add
custom data to your glTF models:
- One is by using the so-called
"extras"attribute attached to theglTFnode- ormesh-object. - The other is by using custom vertex attributes.
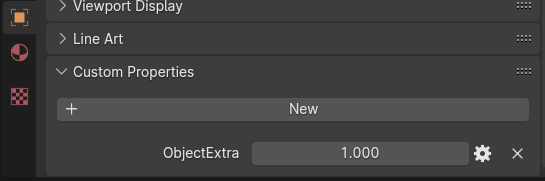
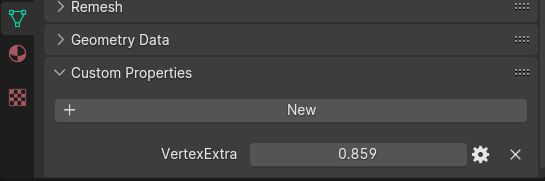
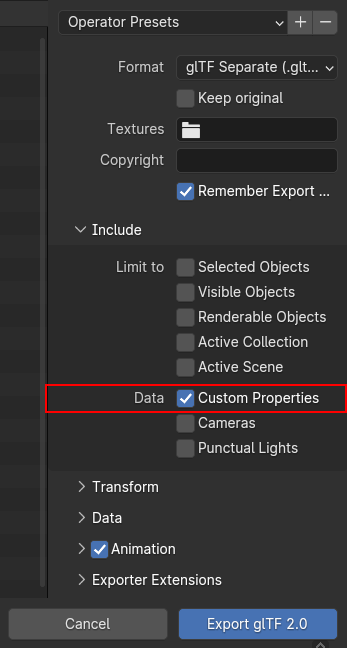
For small chunks of data, the extras attribute is often sufficient. E.g., if
you add some flags to your object. This attribute is easily added from Blender
by setting the export option “Custom Properties” in the glTF export
menu. Then, any values listed among the Custom properties on the Blender side of
things will become available in the node.extras for objects and mesh.extras
for vertices respectively, as seen below:
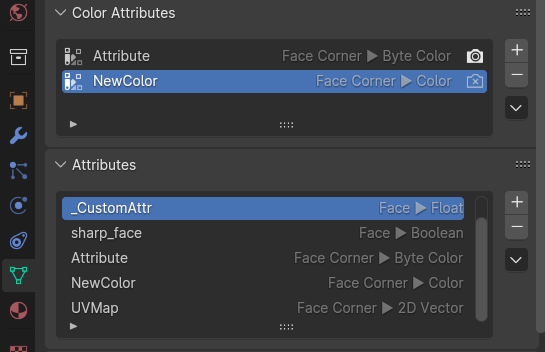
Further, for data that should be applied to every vertex, edge, face, or face-corner of a mesh, using either color attributes or custom vertex attributes is a possibility. For vertices and corners where the data can be represented as a float or byte color format, using a color attribute is recommended, as that is directly supported by Blender, and it is possible to use the built-in vertex-painting tool to directly set the data.
For all other options, it is currently a bit harder to set the data appropriately. Effectively, you have three options:
- Set the data manually, by selecting your vertex, edge, face or corner and clicking
Mesh > Set Attributeand setting the attribute. - Using a custom addon as described here.
- Using Geometry Nodes to redirect the vertex painting process to your custom attributes.
Neither of these approaches are ideal for quickly setting values to many primitives at once, but I am hopeful that this will be improved in the future.
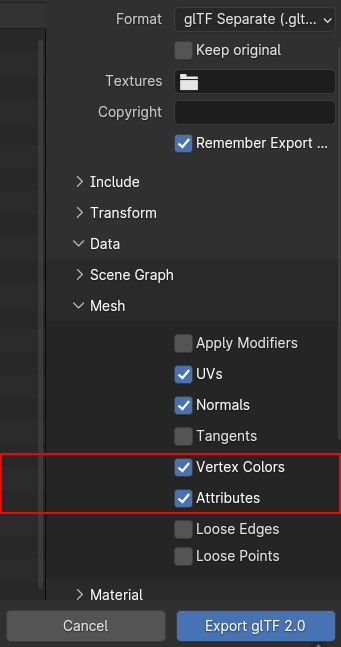
One caveat though: In order for the glTF exporter to actually pick up the
custom attribute, the name must start with an underscore (_) and the option
Data > Mesh > Attributes must be enabled in the glTF export menu. Vertex
color attributes, in contrast gets enabled by the option Data > Mesh > Vertex
Color, and are typically set to the glTF-attribute "COLOR_0", however I
would recommend to only use a single vertex color attribute for now, as there
seem to be some complications with using multiple "COLOR_" attributes at the
moment. If I am reading this right, you need to make sure that the shader graph
actually uses any secondary colors for them to be exported.
Conclusion
And with that, I will conclude this post. It arguably contains much of the same content as the original presentation, but in a format that may be a bit more useful as a reference if you are looking something up. Hopefully, this all helps someone out here!